How to Mouth Tape: 11 Things to Know Before You Try It
Published on
February 3, 2026
Author
Craig Chou
Project Writer | Craig Chou encourages a holistic approach to fitness and well-being. His dedication to maintaining an open mind and challenging traditional medical literature with insights from contemporary studies sets him apart as a forward-thinking writer. He also studies Eastern medicinal techniques, and tries to bring Western ideas into it, thereby bridging two schools of thought in medicinal approach into one.
Can music and movement help fine motor skills?
Yes—finger plays, clapping games, and dance routines that use hand gestures all help. Combine rhythm and repetition for deeper learning.
How can educators encourage home practice?
Send home simple activity ideas, kits, or worksheets. Offer short instructions and encourage family involvement. Regular practice builds lasting progress.
What crafts are best for fine motor practice?
Try origami, sticker scenes, stringing pasta, or painting with Q-tips. Crafts that use small pieces build precision and control.
Mouth taping has gained popularity as a potential method to improve sleep quality, reduce snoring, and encourage nasal breathing. Advocates claim that taping your mouth at night can enhance airflow, prevent dry mouth, and even support overall health. However, is there enough evidence to support mouth taping, or is it just another passing trend? In this article, we will explore how to use mouth tape effectively.
Mouth taping is a technique used to encourage nasal breathing during sleep, which can help reduce snoring, improve oxygen intake, and enhance overall sleep quality. If you're considering trying it, follow this step-by-step guide to ensure a safe and effective experience.
Step 1: Choose the Right Tape
The first and most crucial step in how to mouth tape is selecting the right tape. Not all adhesives are safe or comfortable for this purpose, so it's essential to choose one designed for skin application. Here’s what to consider:
Hypoallergenic Tape – This type of tape is formulated to be gentle on the skin, minimizing the risk of irritation, redness, or allergic reactions. It’s a great choice for individuals with sensitive skin or those prone to allergies.
Surgical Tape – Specifically made for medical use, surgical tape is breathable, safe for prolonged skin contact, and easy to remove without causing discomfort. It’s a popular choice for beginners.
Athletic Tape – While some people use athletic tape as an alternative, it may not be the best option for overnight use. It is often thicker and less breathable, which could cause discomfort over extended periods.
Pre-Cut Mouth Strips – These are designed exclusively for mouth taping and come in convenient, ready-to-use strips. They are typically made from soft, skin-friendly material that adheres well but is easy to remove. If you want a hassle-free experience, pre-cut mouth strips are an excellent choice.
Avoid Household Tapes (e.g., Scotch Tape, Duct Tape, Masking Tape) – These tapes are not made for skin application and may cause irritation, rashes, or even small abrasions when removed. They also lack the breathability needed for safe overnight use.
Pro Tip: If you’re new to mouth taping and unsure which tape to start with, opt for hypoallergenic surgical tape or pre-cut mouth strips. These options provide a balance of comfort, safety, and effectiveness.
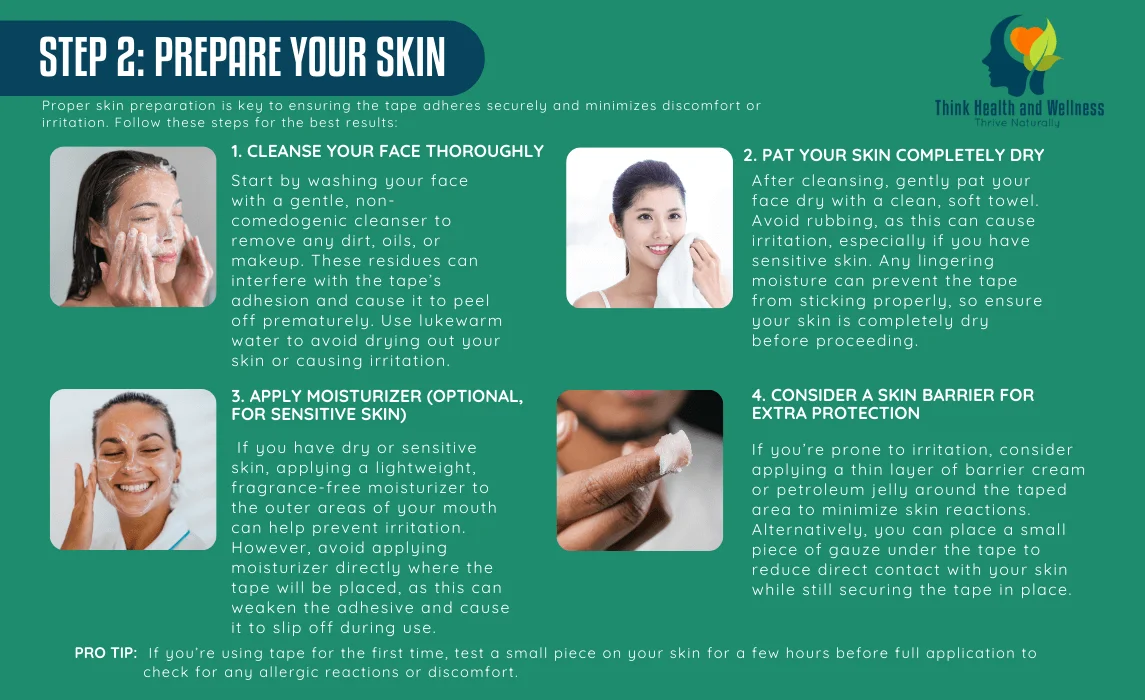
Step 2: Prepare Your Skin
Proper skin preparation is key to ensuring the tape adheres securely and minimizes discomfort or irritation. Follow these steps for the best results:
Cleanse Your Face Thoroughly - Start by washing your face with a gentle, non-comedogenic cleanser to remove any dirt, oils, or makeup. These residues can interfere with the tape’s adhesion and cause it to peel off prematurely. Use lukewarm water to avoid drying out your skin or causing irritation.
Pat Your Skin Completely Dry - After cleansing, gently pat your face dry with a clean, soft towel. Avoid rubbing, as this can cause irritation, especially if you have sensitive skin. Any lingering moisture can prevent the tape from sticking properly, so ensure your skin is completely dry before proceeding.
Apply Moisturizer (Optional, for Sensitive Skin) - If you have dry or sensitive skin, applying a lightweight, fragrance-free moisturizer to the outer areas of your mouth can help prevent irritation. However, avoid applying moisturizer directly where the tape will be placed, as this can weaken the adhesive and cause it to slip off during use.
Consider a Skin Barrier for Extra Protection - If you’re prone to irritation, consider applying a thin layer of barrier cream or petroleum jelly around the taped area to minimize skin reactions. Alternatively, you can place a small piece of gauze under the tape to reduce direct contact with your skin while still securing the tape in place.
Pro Tip: If you’re using tape for the first time, test a small piece on your skin for a few hours before full application to check for any allergic reactions or discomfort.
Step 3: Apply the Tape
There are a few ways to apply mouth tape, depending on your comfort level. Here are the most common methods:
Option 1: Tape Across the Entire Mouth
Cut the tape: Use scissors to cut a piece of tape about 2-3 inches long.
Close your lips: Gently press your lips together.
Apply the tape: Place the tape horizontally across your closed lips, ensuring it covers the center and both corners.
Press gently: Use your fingers to press the tape firmly but gently onto your skin. Make sure it’s secure but not too tight.
Option 2: Tape the Corners of the Mouth
Cut the tape: Cut two small pieces of tape, each about 1 inch long.
Close your lips: Gently press your lips together.
Apply the tape: Place one piece of tape on each corner of your closed lips.
Press gently: Secure the tape by pressing it gently onto your skin.
Option 3: Use Pre-Cut Mouth Strips
Open the package: Remove a pre-cut strip from its packaging.
Close your lips: Gently press your lips together.
Apply the strip: Place the strip horizontally across your closed lips.
Press gently: Secure the strip by pressing it gently onto your skin.
Pro Tip: If you’re new to mouth taping, start with Option 2 (taping the corners) for added comfort and flexibility.
Step 4: Test It Out
Before committing to wearing mouth tape for an entire night, it's crucial to test it during the day to ensure you feel comfortable and can breathe easily through your nose. This trial run will help you determine if any adjustments are needed before bedtime. Follow these steps:
Apply the Tape – Use one of the methods described earlier, ensuring the tape is securely in place but not too tight. If you're using a specialized mouth tape, follow the manufacturer's instructions. If using regular medical tape, consider folding a small tab at one end for easy removal.
Lie Down – Find a comfortable position that mimics how you typically sleep at night, whether it's on your back, side, or stomach. This will give you a realistic idea of how the tape will feel when you’re actually asleep.
Relax and Observe – Spend about 10-15 minutes resting with the tape on. Focus on nasal breathing and allow your body to adjust to the sensation. If you notice any strain or discomfort, resist the urge to remove the tape immediately—sometimes, it just takes a little getting used to.
Assess Your Comfort Level – Pay close attention to how you feel. Are you breathing easily? Do you feel any anxiety or irritation? If you experience difficulty breathing, discomfort, or an overwhelming urge to remove the tape, try adjusting its placement or experimenting with a different taping method.
Pro Tip: If nasal breathing feels unnatural or challenging, practice during the day without tape first. Engage in exercises like deep nasal breathing, alternate nostril breathing, or humming to strengthen your nasal airflow. This will make the transition to mouth taping at night much smoother.
Step 5: Sleep with Mouth Tape
Now that you're comfortable using mouth tape during the day, it's time to incorporate it into your nighttime routine. Proper use can help improve breathing efficiency, reduce snoring, and enhance sleep quality. Follow these tips for the best experience:
Start Slow - For your first night, try keeping the tape on for just a few hours rather than the entire night. This gradual adjustment helps your body get used to nasal breathing while you sleep. Over the next few nights, slowly increase the duration until you can wear the tape comfortably until morning.
Stay Consistent - To see the best results, make mouth taping a regular habit. Consistency is key in training your body to breathe through your nose while sleeping, which can lead to long-term benefits such as better oxygenation, reduced dry mouth, and deeper rest.
Monitor Your Comfort - Pay attention to how you feel when you wake up. If you experience discomfort, irritation, or trouble breathing, you may need to adjust how you apply the tape. Some people find it helpful to use a smaller strip or a more breathable type of tape. Experiment with different brands to find one that works best for you.
Keep Your Nose Clear - Since mouth taping relies on nasal breathing, ensure your nose is free of congestion. If you're prone to stuffiness, consider using a saline spray, a neti pot, or Breathe Right nasal strips before bed. This will help open your airways and make the transition to nasal breathing more comfortable.
Pro Tip: Set a Reminder: If you’re concerned about forgetting to remove the tape in the morning, set an alarm or reminder on your phone. This ensures you don’t rush into your morning routine with the tape still on, especially if you need to speak early in the day.
Step 6: Remove the Tape
In the morning, gently remove the tape to avoid irritating your skin. Here’s how to do it properly:
Peel Slowly - Start at one corner of the tape and carefully lift it away from your skin. Pulling too quickly can cause discomfort or leave behind sticky residue. Instead, peel the tape off gradually, keeping it as close to your skin as possible to minimize tugging.
Use Warm Water (If Needed) - If the tape is firmly stuck or feels uncomfortable to remove, don’t force it. Instead, soak a soft cloth or cotton pad in warm water and gently press it against the tape for 30 seconds. This helps loosen the adhesive, making removal easier and reducing potential skin irritation.
Clean Your Skin - Once the tape is removed, use a mild, fragrance-free cleanser to wash away any remaining adhesive residue. Avoid harsh scrubbing, as this can cause redness or irritation. If any sticky spots remain, a bit of coconut oil or baby oil on a cotton pad can help dissolve them gently.
Pro Tip: After removing the tape, apply a lightweight, hydrating moisturizer to soothe your skin and restore moisture. If you have sensitive skin, choose a product with calming ingredients like aloe vera or chamomile.
Tips for Successful Mouth Taping
Keep Your Nose Clear: If you have nasal congestion, mouth taping may not work well. Use a saline spray or breathe right nasal strips to clear your nose before bed.
Stay Hydrated: Drink plenty of water throughout the day to prevent dry mouth.
Practice Nasal Breathing: During the day, focus on breathing through your nose to train your body for nighttime. If the sensation makes you anxious at first, try relaxation techniques for anxiety alongside daytime nasal-breathing practice.
Consult a Doctor: If you have sleep apnea or other medical conditions, talk to your healthcare provider before trying mouth taping.
Mouth taping isn’t for everyone. Avoid it if you have nasal congestion, trouble breathing through your nose, untreated sleep apnea, or any breathing-related condition. If you’re unsure, ask a healthcare professional first.
2. What type of tape is best for mouth taping?
The best options are hypoallergenic medical or surgical tape made for skin. Some people prefer pre-cut mouth strips designed for sleep. Avoid household tapes like duct tape or Scotch tape.
3. Can mouth taping help with snoring?
Mouth taping may reduce snoring if your snoring is related to mouth breathing. If snoring is loud, frequent, or comes with choking/gasping, get evaluated for sleep apnea instead of relying on tape.
4. How do I mouth tape if I’m new to it?
Start with a small strip or tape only the corners of your mouth so you can adjust comfortably. Do a short daytime test first to make sure you can breathe easily through your nose.
5.How do I remove mouth tape without irritating my skin?
Peel it off slowly from one corner. If it’s stuck, soften the adhesive with warm water before removing. Afterward, wash off residue gently and apply a light moisturizer to calm the area.